Unlock Flawless Stained Surfaces With Our Guide To Using Sherwood Wipe Stain
Sherwood Wipe Stain: A Guide to Application
Sherwood Wipe Stain is a type of wood stain applied using a cloth or sponge. It's popular for its ease of use, allowing homeowners and DIY enthusiasts to achieve professional-looking results without complex tools or techniques.
In this comprehensive guide, we'll explore the importance and benefits of Sherwood Wipe Stain, delve into its historical development, and provide detailed instructions on how to apply it effectively. Get ready to transform your wooden surfaces with this versatile and user-friendly stain.
- Fun Fact Is Sydney Leroux Lesbian And
- Who Is Jay Boogie The Cross Dresser
- Milo Ventimiglia Reportedly Dating New Girlfriend Jarah
- Is Sam Buttrey Jewish Religion And Ethnicity
- Jasprit Bumrah Injury Update What Happened To
How Do You Use Sherwood Wipe Stain
Understanding the various aspects of Sherwood Wipe Stain application is crucial for achieving optimal results. These key aspects encompass different dimensions, ranging from preparation to technique and safety considerations.
- Surface preparation
- Stain selection
- Application tools
- Grain direction
- Drying time
- Sealing
- Safety precautions
- Troubleshooting
- Project planning
These aspects are interconnected and influence the overall outcome of your staining project. Proper surface preparation ensures good adhesion, while selecting the right stain shade and application tools helps you achieve the desired look and finish. Understanding grain direction minimizes blotchiness, and allowing adequate drying time prevents smudging. Sealing protects the stained surface, and following safety precautions minimizes risks. Troubleshooting common issues helps you navigate challenges, and meticulous project planning sets you up for success.
Surface preparation
Surface preparation is a critical component of using Sherwood Wipe Stain effectively. A well-prepared surface ensures the stain adheres properly, resulting in a smooth, even finish. Neglecting surface preparation can lead to blotchiness, uneven absorption, and poor adhesion, compromising the overall appearance and durability of the stained surface.
- Legendary Rella S Relationship Status Is She
- Matthew Cassina Dies In Burlington Motorcycle Accident
- Antony Varghese Wife Net Worth Height Parents
- Noah Pc3a9rez Chris Perez Son Age
- Janice Huff And Husband Warren Dowdy Had
Proper surface preparation involves cleaning the surface to remove any dirt, grease, or other contaminants. Sanding the surface lightly helps to smooth out any imperfections and create a more receptive surface for the stain. If the surface is particularly rough or uneven, it may be necessary to use a wood filler to fill in any gaps or holes.
By taking the time to properly prepare the surface, you can ensure that your Sherwood Wipe Stain application will be successful and that the finished product will be of the highest quality. Here are some practical examples of surface preparation in action:
- Cleaning a wooden deck with a power washer to remove dirt and debris before staining.
- Sanding a tabletop to smooth out the surface and remove any old finish before applying a new stain.
- Filling in nail holes or cracks in a piece of furniture with wood filler before staining to create a smooth, even surface.
Stain selection
Stain selection is a crucial aspect of using Sherwood Wipe Stain effectively. The type of stain you choose will determine the final color and finish of your project, so it's important to take the time to select the right one. Here are a few factors to consider when choosing a stain:
- Wood species: Different types of wood absorb stain differently, so it's important to choose a stain that is compatible with the type of wood you're using.
- Desired color: Sherwood Wipe Stain is available in a wide range of colors, so you can choose the one that best matches your desired look.
- Finish: Sherwood Wipe Stain can be used to create a variety of finishes, from a natural look to a more distressed look.
- Durability: Some stains are more durable than others, so it's important to choose a stain that will stand up to the wear and tear of everyday use.
By considering these factors, you can choose the right Sherwood Wipe Stain for your project and achieve the desired results. For example, if you're staining a piece of furniture that will be used heavily, you'll want to choose a durable stain that will resist scratches and wear. If you're staining a piece of wood that has a beautiful grain pattern, you'll want to choose a stain that will enhance the grain rather than hiding it.
Application tools
Application tools play a crucial role in the successful use of Sherwood Wipe Stain. The right tools can help you achieve a smooth, even finish, while the wrong tools can lead to blotchiness, streaks, and other problems.
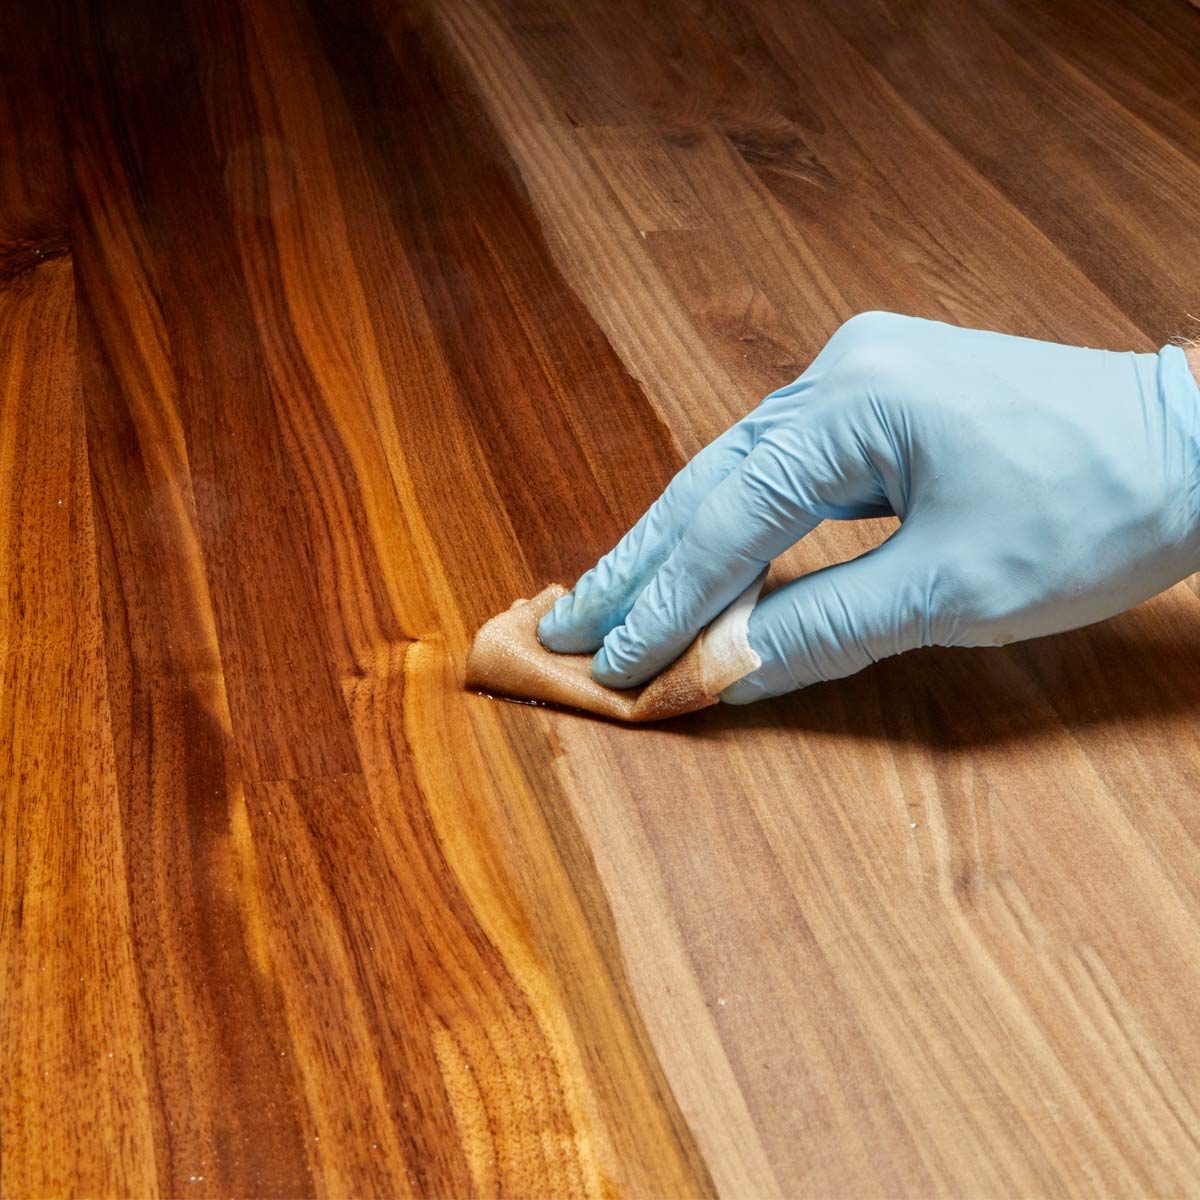
- Rags: Soft, clean rags are the most common tool for applying Sherwood Wipe Stain. They are easy to use and can be used to apply the stain evenly over large surfaces.
- Sponges: Sponges are another good option for applying Sherwood Wipe Stain. They are especially useful for applying the stain to detailed areas or for creating a distressed look.
- Brushes: Brushes can be used to apply Sherwood Wipe Stain, but they are not as common as rags or sponges. Brushes are best used for applying the stain to small areas or for creating a more textured finish.
- Grain brushes: Grain brushes are specially designed brushes that are used to apply Sherwood Wipe Stain along the grain of the wood. This helps to create a more even finish and minimizes the risk of blotchiness.
In addition to these basic tools, there are a number of other tools that can be used to apply Sherwood Wipe Stain, such as sprayers, rollers, and pads. The best tool for the job will depend on the size and shape of the surface you are staining, as well as the desired finish.
Grain direction
Grain direction plays a crucial role in how Sherwood Wipe Stain is applied and the final appearance of the stained surface. Wood grain refers to the natural pattern of the wood fibers, which can vary depending on the type of wood and how it was cut. When applying Sherwood Wipe Stain, it is important to follow the direction of the grain to achieve an even, professional-looking finish.
Applying Sherwood Wipe Stain against the grain can cause the stain to pool and create a blotchy, uneven appearance. This is because the wood fibers are more likely to absorb the stain unevenly when they are not aligned with the direction of application. By following the grain direction, the stain can be applied more evenly and absorbed more consistently, resulting in a smoother, more natural-looking finish.
In addition, following the grain direction can help to enhance the natural beauty of the wood. By applying the stain with the grain, the stain will accentuate the wood's natural grain pattern, creating a more visually appealing finish. This is especially important for fine woods with a beautiful grain pattern, such as mahogany or oak.
Understanding the connection between grain direction and Sherwood Wipe Stain application is essential for achieving optimal results. By following the grain direction, you can ensure that the stain is applied evenly and consistently, resulting in a beautiful, professional-looking finish that enhances the natural beauty of the wood.
Drying time
Drying time is a critical aspect of using Sherwood Wipe Stain effectively. Understanding the factors that influence drying time and how to manage it properly can ensure optimal results and a beautiful, durable finish.
- Temperature: Temperature plays a significant role in drying time. Warmer temperatures generally lead to faster drying times, while colder temperatures slow down the drying process.
- Humidity: Humidity also affects drying time. Higher humidity levels can slow down the drying process, while lower humidity levels can speed it up.
- Airflow: Good airflow can help to speed up the drying process by removing moisture from the surface of the wood.
- Stain type: Different types of stains have different drying times. Oil-based stains typically take longer to dry than water-based stains.
- Number of coats: Applying multiple coats of stain will increase the overall drying time.
By understanding these factors and managing drying time accordingly, you can ensure that your Sherwood Wipe Stain project turns out beautifully and lasts for years to come.
Sealing
Sealing is a critical component of the process of using Sherwood Wipe Stain effectively. Without proper sealing, the stain will not be protected from the elements and will be more susceptible to damage. In addition, sealing helps to enhance the color and beauty of the stained wood.
There are a variety of sealants available, each with its own advantages and disadvantages. Some of the most common types of sealants include polyurethane, varnish, and wax. Polyurethane is a durable sealant that is resistant to water and UV damage. Varnish is a clear sealant that is easy to apply and dries to a high gloss finish. Wax is a natural sealant that is easy to apply and gives wood a warm, matte finish.
The type of sealant you choose will depend on the specific project you are working on. For example, if you are staining a piece of furniture that will be used outdoors, you will need to choose a sealant that is resistant to water and UV damage. If you are staining a piece of furniture that will be used indoors, you may be able to get away with using a less durable sealant.
No matter what type of sealant you choose, be sure to follow the manufacturer's instructions for application. Applying the sealant correctly will help to ensure that your stained wood is protected and looking its best for years to come.
Safety precautions
When using Sherwood Wipe Stain, safety precautions must be taken to minimize any potential risks. These measures include using appropriate protective gear and maintaining a clean work environment, among other considerations.
- Protective gear: Wear gloves, eye protection, and a respirator when using Sherwood Wipe Stain. The chemicals in the stain can be harmful if inhaled or absorbed through the skin.
- Ventilation: Ensure adequate ventilation in the work area. Open windows and doors, or use a fan to circulate air and prevent the buildup of fumes.
- Flammable materials: Keep Sherwood Wipe Stain away from open flames and other sources of ignition. The stain is flammable and can easily catch fire.
- Disposal: Dispose of rags, sponges, and other materials used to apply the stain properly. Do not pour the stain down the drain or into waterways.
By following these safety precautions, you can help to ensure a safe and successful staining project.
Troubleshooting
Troubleshooting is an essential aspect of learning how to use Sherwood Wipe Stain effectively. By understanding the potential problems that can arise and how to solve them, you can ensure a successful staining project. Here are four common troubleshooting scenarios:
- Uneven Color: If the stain is not applied evenly, it can result in a blotchy or streaky finish. To avoid this, make sure to apply the stain in thin, even coats, and wipe off any excess stain immediately.
- Bleeding: If the stain bleeds through the wood, it can create a dark, unsightly finish. To prevent bleeding, make sure to apply a coat of sanding sealer to the wood before staining.
- Drying Problems: If the stain does not dry properly, it can remain tacky or sticky. To ensure proper drying, apply the stain in a well-ventilated area and allow it to dry completely before applying a topcoat.
- Lifting: If the stain is lifted when applying a topcoat, it can create a rough, uneven finish. To avoid lifting, make sure to allow the stain to dry completely before applying a topcoat, and use a compatible topcoat that is designed for use over stains.
By understanding these common troubleshooting scenarios and how to solve them, you can ensure a beautiful, professional-looking finish when using Sherwood Wipe Stain.
Project planning
Project planning is a crucial aspect of using Sherwood Wipe Stain effectively. By thoughtfully considering the various stages of your project, you can increase the likelihood of achieving your desired results and avoid costly mistakes.
- Scope definition: Clearly define the scope of your project, including the specific pieces of furniture or surfaces you plan to stain. This will help you determine the amount of stain needed and the appropriate application techniques.
- Surface preparation: Plan for thorough surface preparation, including cleaning, sanding, and any necessary repairs. Proper surface preparation ensures the stain will adhere evenly and last longer.
- Stain selection: Choose the right stain color and finish to match your desired look. Consider the type of wood, the existing finish (if any), and the intended use of the stained surface.
- Application method: Determine the best application method based on the size and shape of the surface, the desired finish, and your personal preferences. Practice on a scrap piece of wood before applying the stain to the actual project.
By following these project planning steps, you can set yourself up for a successful staining project. Remember to consider the specific requirements of your project, and don't hesitate to seek professional advice if needed.
FAQs on Using Sherwood Wipe Stain
This FAQ section addresses common questions and provides additional insights to help you use Sherwood Wipe Stain effectively. Find answers to queries about surface preparation, application techniques, troubleshooting, and more.
Question 1: How do I prepare the surface before applying Sherwood Wipe Stain?
Proper surface preparation is essential. Start by cleaning the surface with a suitable cleaner. Sand the surface lightly using fine-grit sandpaper to smooth out any rough spots and remove old finish. Remove sanding dust thoroughly before staining.
Question 2: Can I apply Sherwood Wipe Stain over an existing finish?
Sherwood Wipe Stain is not recommended for use over existing finishes. Remove the old finish completely by sanding or using a chemical stripper before applying the stain. This ensures proper adhesion and prevents the old finish from affecting the stain's appearance.
Question 3: What's the best way to apply Sherwood Wipe Stain?
Apply Sherwood Wipe Stain using a clean cloth, sponge, or brush. Apply thin, even coats, wiping along the wood grain. Avoid applying too much stain, as this can lead to blotching. Wipe off any excess stain immediately with a clean cloth.
Question 4: How long does Sherwood Wipe Stain take to dry?
Drying time varies based on factors like temperature, humidity, and the number of coats applied. Allow at least 24 hours for the stain to dry completely before applying a topcoat. Ensure proper ventilation during drying.
Question 5: Can I use Sherwood Wipe Stain outdoors?
Sherwood Wipe Stain is suitable for both indoor and outdoor use. However, it's recommended to apply an exterior-grade topcoat to protect the stained surface from the elements and extend its lifespan.
Question 6: How do I fix common problems like blotching or uneven staining?
Blotching can occur due to uneven application or inadequate surface preparation. Sand the affected area lightly and reapply the stain. For uneven staining, apply additional coats of stain to the lighter areas, ensuring even distribution.
These FAQs provide essential guidance on using Sherwood Wipe Stain. Remember to always follow the manufacturer's instructions and practice on a small inconspicuous area before starting your main project.
In the next section, we'll delve into advanced techniques for achieving specific effects and troubleshooting more complex staining challenges.
Tips for Using Sherwood Wipe Stain Effectively
This section provides practical tips to help you achieve professional-looking results when using Sherwood Wipe Stain. Follow these expert recommendations to enhance the beauty and durability of your stained surfaces.
Tip 1: Use a Tack Cloth to Remove Dust: Before staining, wipe down the surface with a tack cloth to remove any dust or debris that could interfere with the stain's adhesion.
Tip 2: Apply Thin, Even Coats: Apply Sherwood Wipe Stain in thin, even coats, wiping along the grain of the wood. Avoid applying too much stain, as this can lead to blotching.
Tip 3: Wipe Off Excess Stain: Immediately after applying each coat, wipe off any excess stain with a clean cloth. This helps prevent streaks and unevenness.
Tip 4: Allow Ample Drying Time: Allow each coat of stain to dry completely before applying the next. Drying time can vary depending on factors like temperature and humidity.
Tip 5: Use a Polyurethane Topcoat: Protect your stained surface by applying a polyurethane topcoat. This will enhance the stain's durability and resistance to wear and tear.
Tip 6: Sand Between Coats: For a smoother finish, lightly sand the surface with fine-grit sandpaper between coats of stain. This helps remove any raised grain and ensures a uniform appearance.
By following these tips, you can maximize the effectiveness of Sherwood Wipe Stain and create beautiful, long-lasting stained surfaces.
In the next section, we'll provide advanced techniques for troubleshooting common staining problems and achieving specialized effects.
Conclusion
This comprehensive guide has provided in-depth insights into "How Do You Use Sherwood Wipe Stain." We've explored essential aspects like surface preparation, stain selection, application techniques, troubleshooting, and advanced tips. A key takeaway is the importance of proper surface preparation, as it ensures the stain adheres properly and enhances the overall finish.
Furthermore, understanding the different application methods and techniques allows you to achieve the desired look and. Remember, patience and attention to detail are crucial for successful staining projects. By following the guidance outlined in this article, you can confidently use Sherwood Wipe Stain to create beautiful and durable stained surfaces that will elevate the aesthetics of your home or project.
- Meet Jordyn Hamilton Dave Portnoy S Ex
- Where Was I Want You Back Filmed
- Janice Huff And Husband Warren Dowdy Had
- Who Is Natalie Tene What To Know
- Patrick Alwyn Age Height Weight Girlfriend Net
Pro Tips for Using WipeOn Polyurethane The Family Handyman

Sherwood on BBC One Cast, what it's about and when drama airs

How to Find Out Who Made a Fake Instagram Account Zeru
